
Quickstart: send your first automated test report
This walkthrough takes about five minutes. By the end you will have a TestNod project receiving JUnit XML reports from a GitHub Actions workflow. The example uses the official TestNod uploader action, which keeps the change to your CI to a single step.
Step 1: Create a TestNod account and project
If you haven't signed up for TestNod yet, you'll need to do that first. TestNod is currently in private beta, so you can request an invite on the TestNod homepage. After creating your account, you'll create your TestNod organization, then you can create a new project, which takes only 30 seconds.
Once a project is created, open its settings page and copy the project token. Every upload you want to assign to the project needs to be scoped to that token, so treat it like an API key and store it as a CI secret rather than checking it into your repository.

Step 2: Add the project token as a GitHub secret
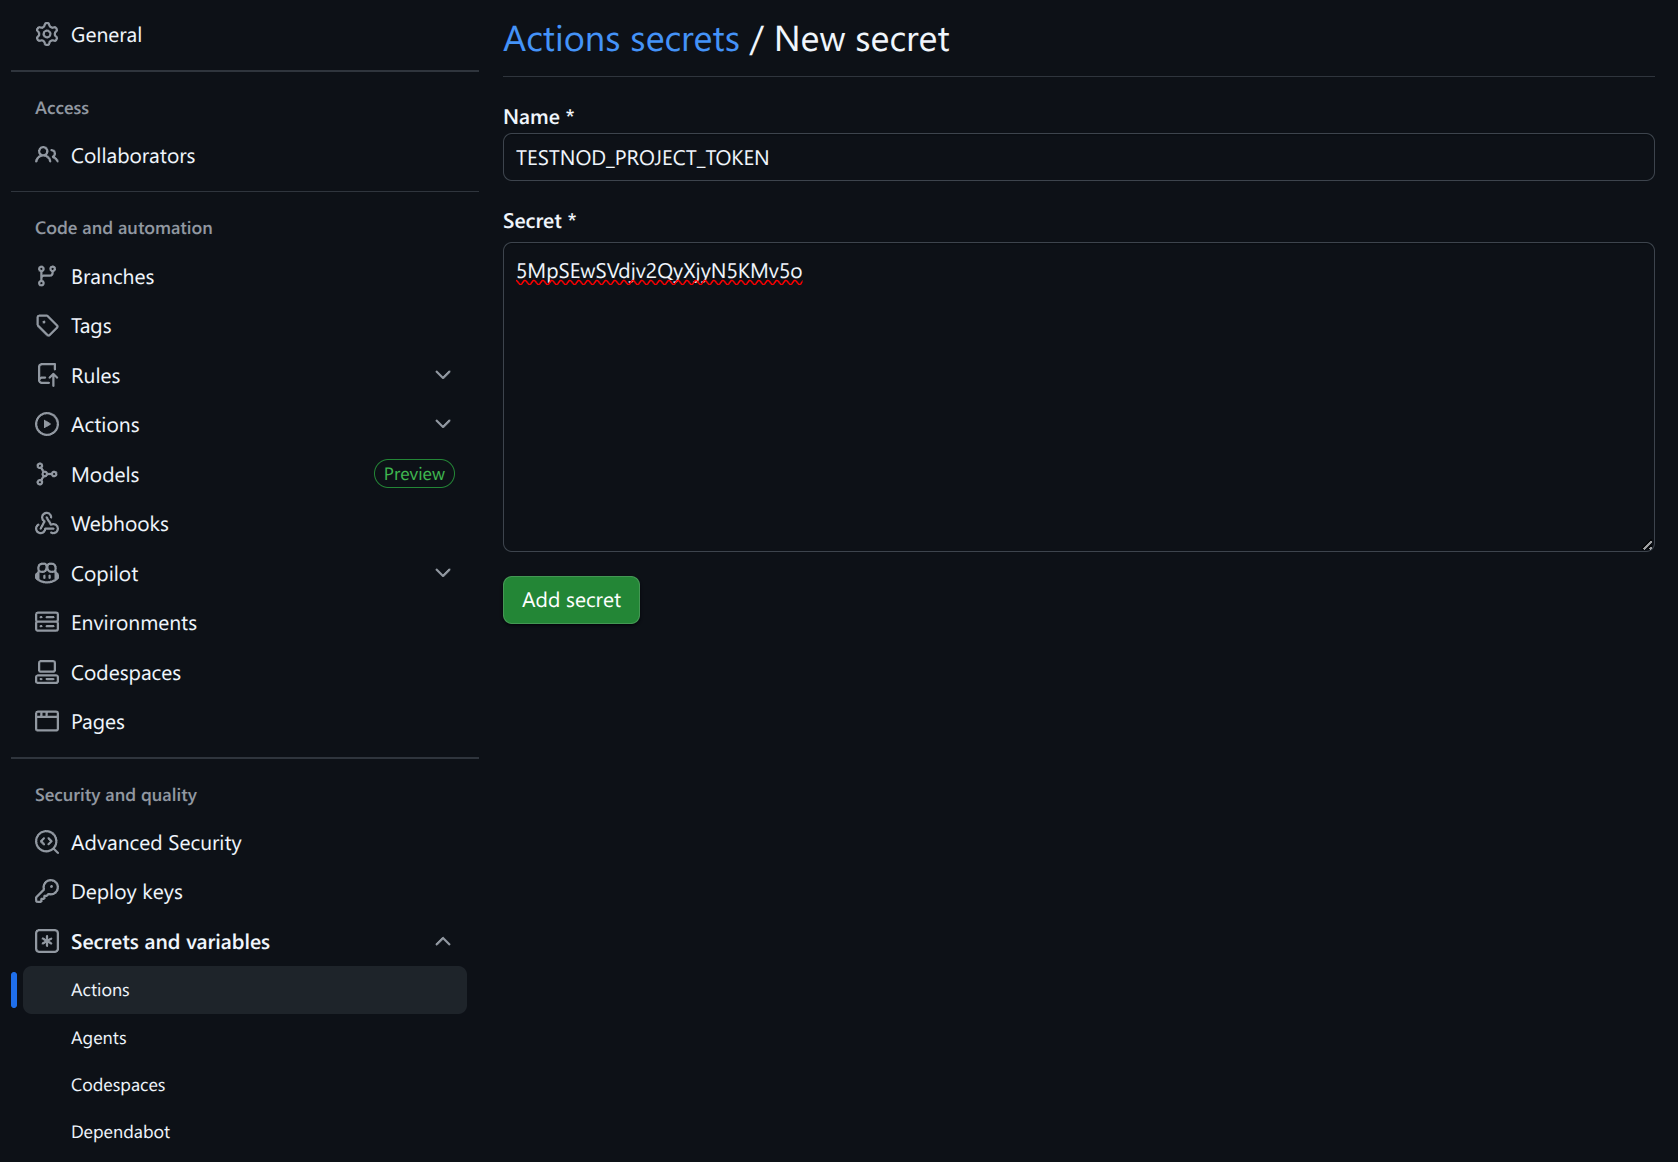
In your GitHub repository, open Settings → Secrets and variables → Actions and add a new repository secret named TESTNOD_PROJECT_TOKEN. Paste the project token from the previous step in as the value. The workflow reads it via ${{ secrets.TESTNOD_PROJECT_TOKEN }}, so the token never appears in your workflow YAML or in workflow logs.
Step 3: Generate JUnit XML reports from your tests
All you need is a JUnit XML report from your test framework. Most test frameworks will run tests in a single process, but TestNod can also handle multiple JUnit XML files per test run if your test framework runs in parallel or across multiple runners.
Many automated test runners can produce JUnit output without additional configuration. If yours does not, there are usually third-party libraries that can produce JUnit XML reports. Please refer to your test framework's documentation for how to generate JUnit XML reports from your test runs.
Step 4: Add the upload step to your CI workflow
Add an upload step after your test step in your CI workflow, which will handle sending the JUnit XML file to TestNod and creating a new test run you can follow in the TestNod dashboard.
The following is a shortened example of a GitHub Actions workflow that runs RSpec tests and uploads a single JUnit XML report to TestNod:
name: CI
on:
  push:
    branches: [main]
  pull_request:

jobs:
  test:
    runs-on: ubuntu-latest
    steps:
      - uses: actions/checkout@v4

      - name: Run tests
        run: bundle exec rspec --format progress \
          --format RspecJunitFormatter --out tmp/rspec.xml

      - name: Upload test results to TestNod
        if: ${{ !cancelled() }}
        uses: testnod/testnod-uploader-action@v1
        with:
          file: tmp/rspec.xml
          token: ${{ secrets.TESTNOD_PROJECT_TOKEN }}
          tags: ci,rspec
          ignore-failures: true
The file input points to the JUnit XML file generated by the test step, and the token input reads the project token from the GitHub secret you set up in Step 2.
The tags input is an essential part of TestNod, as it allows you to group test runs, filter them in the dashboard, and performs its analysis against other test runs using the same tags. In this example, the tags ci and rspec are added to every test run uploaded from this workflow, but you can choose any tags that make sense for your project.
The branch name, commit SHA, build ID, and a link back to the GitHub Actions run are attached automatically from the workflow environment, so the TestNod run page points right back at the originating CI run.
Step 5: Open the test run in TestNod
After your CI workflow finishes running with the new upload step, open the project from your dashboard. You should see the new test run listed within a few seconds of the upload step finishing. The test run will start as "pending" while TestNod processes the JUnit XML reports, and will update its status when it has the results ready.
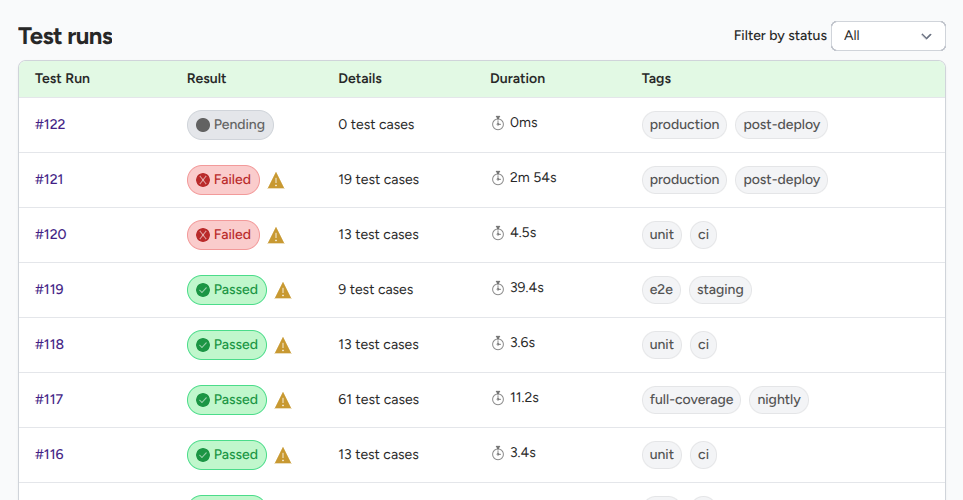
If you do not see the test run appear in your project or the status is incorrect, the Troubleshooting uploads page can help you figure out how to fix the most common issues. You can also send a message to the TestNod team via the in-app chat or email support if you need a hand.
What's next
From there, the Test run page tour is the next stop, and the GitHub Actions integration page covers additional details for handling parallel builds and other inputs the action can accept.